
Guess what I did last week? Just a little "Sewin' With My Gnomies," yo! What a wonderful machine embroidery event this was. But don't just take my word for it--here's what a few of my fellow "gnomies" had to say:
"I learned so much!"
"I loved the tips and tricks!"
"LOVED experimenting with color!"
"I loved the feeling of being with everyone, especially during an isolating time."
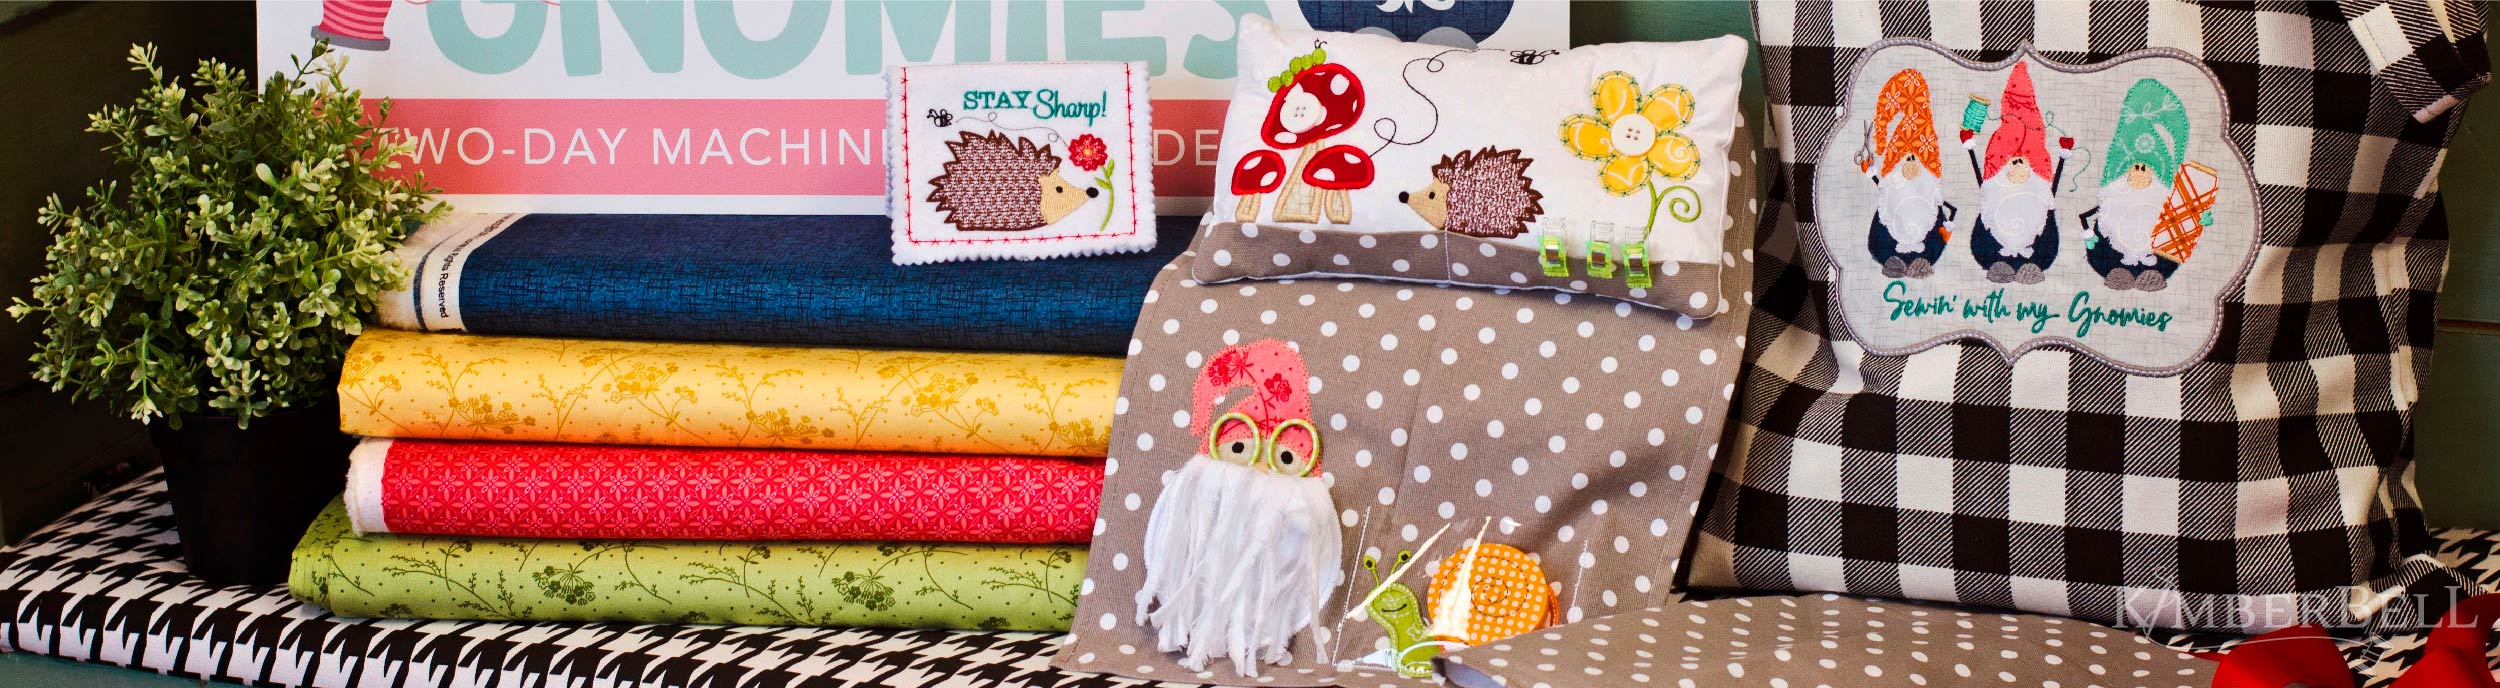
Kimberbell Events (either virtual or in-person) are a delightful place to learn new things, make highly-creative projects, and simply have a great time with other stitching enthusiasts. Sewin' With My Gnomies is no exception! This two-day machine embroidery event includes five darling projects: the Hedgehog Needle Keeper, Gnome Garden Pincushion, The Gnome Knows Sewing Caddy, The Buffalo Gnomes Tote, and the Pocket Full of Posies Apron. Now, I've been to several Kimberbell Events, but I'll admit to feeling just a little intimidated with this one. Gnomies was my first two-day event, and the projects seemed a little more involved than anything I'd done before. But I'm happy to report that the wonderful teachers and those full-color, step-by-step Kimberbell instructions saw me through yet again!
But I'm getting ahead of myself, here. Let's start at the beginning.
 The first item of business for any Kimberbell Event is to sign up through your favorite quilt shop. So, you know, I did that. :) After registering and before the big day(s) came, my shop gave me the Attendee Kit, along with detailed information about what to expect. (It should be noted that each shop hosts events in their own way. They'll communicate with you on how the day(s) will go and what you'll need to do to prepare.) My quilt shop held this event virtually through Zoom software, and I received emails from them beforehand with the Zoom link and an outline of how the event would go.
Now, in the days leading up to an event, I always bust out my Attendee Kit and take a good look at the instructions. The Attendee Kit comes with the designs, fabric, blanks, and embellishments needed to finish all of the event projects; however, I'm responsible for having the right stabilizers and thread colors on hand. The instructions include this information, so I'm able to gather what I need before the event begins. I also make sure I'm armed with bobbins, needles, and snacks!
When the day finally arrived and I logged into Zoom, I was warmly greeted by my shop owner, her staff, and two smiling gnome instructors. (Seriously, they were dressed as gnomes. FUN.) Before we dove into the projects, my shop owner reminded all of us that it was okay to fall behind and also okay to make mistakes. She said that if anything went awry, we were to breathe deeply, tell ourselves "Namaste...namaste..." and reach out to them through the Zoom chat feature for help.
After the cheerful greeting and pep talk, we dove into our first project. I was ready to go, eager to start, and totally prepared.
Or so I thought. You see, despite all of my preparations, I had forgotten one very important thing: I didn't check what hoop sizes were required for the event projects. My machine has a 5x7 hoop, and there are three projects in Sewin' With My Gnomies that require a 6x10. Ack! So, after realizing my oversight, there was just one thing to say: "Namaste...namaste..."
After breathing deeply for a few minutes, I decided to stitch the 5x7 projects the first day with my machine, then arrange to borrow a machine with a 6x10 hoop for the second day. So, friends, please learn from my mistakes! When you sign up for an event, make sure your embroidery machine has the appropriate hoop size/embroidery field for the event projects. Fortunately, I was able to make arrangements to borrow a machine for Day Two. Phew! (Note: If you find yourself in a similar situation, talk to your local quilt shop. They may be able to lend or rent out a machine.)
With my new plan in place, I began stitching the Hedgehog Needle Keeper in a 5x7 hoop. (Isn't he cute?) Some of the attendees even chose to put a little Mylar in the hedgehog for some extra ba-zing, which turned out beautifully. It's so fun to add your own creative touch to event projects!
After having a wonderful time with my hedgehog, I moved on to the Pocket Full of Posies Apron, also made in a 5x7 hoop, which features an over-the-edge applique technique. Now, if you've never tried over-the-edge applique, it's one of those things that looks hard but is, in fact, very simple to do. And want to hear another cool fact? There is a single, polka-dot tea towel (see Dots & Stripes Tea Towel, Steel Grey) in the Gnomies Attendee Kit , and this one towel makes three (count 'em, THREE!) event projects. This is one of them, the very lovely Pocket Full of Posies Apron:
Let's talk briefly about another SUPER HANDY item found in the Sewin' With My Gnomies Attendee Kit. To help keep everything organized and easy to follow, Kimberbell includes charts for some of the projects. Simply match your little fabric pieces to the shapes found on the chart and you'll know which applique fabric goes where. (Talk about a time-saver!) I just got everything ready to go before the event started and knew exactly what to grab the very second I needed it. What a good idea!
Now, when I attend a virtual event, I set my laptop right by my embroidery machine so I don't miss a thing. One of the great perks of virtual events is that the camera can zoom in on what the teacher is demonstrating. It's like having a little private tutorial! The instructors make the projects right along with you, step by step, sharing helpful tips along the way. Virtual events are also sometimes recorded, meaning you can rewatch the video later if you'd like to and go at your own pace! Both virtual and in-person events are fun in their own ways, but one pro of virtual is that up-close instruction.
At the end of Day One, I had two projects I could be proud of and a growing anticipation for Day Two. I couldn't wait to get started on my remaining three projects. (Oh yeah...I also went and picked up that borrowed machine!)
My next two projects were the Gnome Knows Sewing Caddy, topped by the Gnome Garden Pincushion. If you ask me, these two darling projects (stitched separately and later combined) are in a whole new realm of creativity. For starters, they are both made out of the remaining two-thirds of that grey Dots & Stripes Tea Towel. But that's not all. See the darling Measuring Tape & Thread Scissors in the picture above? Well, those scissors become the gnome's glasses (Yeah, that beard is also a pocket!) while the measuring tape is the snail's body behind a pocket of Sweet as Candy Clear Vinyl. I mean, who THINKS of these kinds of things? (Kimberbell, that's who.) In the correct hoop, this project came together beautifully. Sure, it was more involved, but if you take those Kimberbell instructions one step at a time, it all just works.
Speaking of gnomes and all things garden-ish, take a look at the Event Bonus CD: Penny's Garden. (BTW, Penny really does have an amazing garden!) Event Bonus CDs are exclusive to the event and FREE for attendees who spend $100 or more in the Kimberbell Pop-up Shop.
The remaining project of the day was the Buffalo Gnomes Tote, aptly named since it's made with a Buffalo Check Tote. Now, these totes are cute enough in their own right, but the truly WONDERFUL thing about them is that they come with open side seams for easy hooping. Have you ever tried to wrangle a regular tote into a hoop, or dealt with a bag's awkwardness while stitching? Well, if you have, you'll appreciate the open side seams! I hooped the tote (in a 6x10, thank you), added the adorable applique, then sewed up the sides with a simple straight stitch. There's a lot of trimming with this project, since there are so many applique pieces, but it was so much fun to see the little gnomes come to life. We were reminded by our teachers that we could use any thread colors we wanted, so several attendees, including myself, matched the shoes to the hats and also played with the lettering. It was great to share ideas and see everyone's individual creativity shining through their projects.
As the event drew to a close, I felt a great sense of accomplishment. After a somewhat panicky start, I rolled with the unexpected twists and turns and thoroughly enjoyed stitching my projects. I learned new techniques, played with products I'd never used before, and once again felt connected to both my quilt shop and the other attendees. If you ever have the chance to attend Kimberbell's Sewin' With My Gnomies machine embroidery event, embrace your inner "gnomie" and go for it! You won't be sorry.